Tuesday, January 15, 2013

Strawberry Mason Jar Trifle


Strawberry Mason Jar Trifle

In an attempt to make something delicious to take over to a friend's dinner [Lovely Sam and Nehal Desai] AND not break my calorie budget, I decided to make something with fruit.  I actually found sweet, fresh strawberries at Kroger!  In January!  Whoa!  [Thanks to Mexico or Peru, I'm sure.] 


As you might know, I am trying to get rid of this baby weight that has been hanging on for about a year now.  You can check out my other blog, I'm Gonna be a Looser...Today!

I actually didn't work off of a recipe for this one.  I pretty much winged it.  Luckily, it turned out delish!

Here is what you will need for the recipe:

1 Bucket Cool Whip, Lite
2 Small boxes of White Chocolate Pudding
4 Cups Fat Free Milk
2 Pints of Strawberries
1 TBSP Sugar
1 Prepared Angel Food Cake (cut into 8 wedges)
1 White Chocolate bar (shaved)
8 Pint sized Mason Jars

Basically you just need to chop, mix, and assemble.  Pretty easy!

First, we need to get the strawberries macerating. Macerating.  Scary.  Word.  I don't like scary words, but there is no other way to describe this.  Macerating means to break a food down by using a liquid [Thank you Mr. Webster].  In this case, we slice the strawberries and add a little sugar.  The sugar ends up bringing out the liquid in the strawberries and works to break it down.  It basically makes a sweet yummy sauce for the strawberries to bath in [lucky little berries].

I like to slice my strawberries so you get a cross-section of each strawberry.  Mom did it this way, so that's how I do it too :)

Rinse
 
Remove leaves
 
Slice off the top [feed to lucky dog, Chobee]
 
Slice away!

After you have finished slicing, just sprinkle the sugar over the top of the strawberries and stir.  Then cover with plastic wrap and put it in the fridge to chill out for a few hours. 

Now, let's get the pudding going.  I just put the pudding powder in a bowl, poured the cold milk in, and then whisked away for about a minute.  Then pop it in the fridge to hang with the strawberries.  This helps set up the pudding. 


Ready to chill

I LOVE, LOVE, LOVE instant pudding.  Have you ever tried to make a pudding from scratch?  Well, don't waste your time!!!!  OMG.  It took forever, and it didn't taste ANY better than regular old boxed instant pudding.  Ok, I'm better.

The pudding only takes about 5 minutes in the fridge to firm up enough for the trifles.  [Have I said I love instant pudding?]

Now, just cut the cake into 8 wedges.  I cut it in half, and then in half again to make 4 wedges.  Then I cut each wedge in half to make 8.


Now let's shave the white chocolate.  It's not as scary as it sounds...no razors or loss of digits were involved.  I just used a vegetable peeler and run it down the end of the bar.


Now it's time to assemble!!! 

It would be best to set up a work station with the jars on one end, then strawberries, then pudding, then coolwhip, then the white chocolate.  Welllll, I didn't do that.  My work station was all crazy of course!

Add to the jar in this order:
1 - Half of one wedge of cake, crumbled up
2 - 2 TBSP Strawberries
3 - 1/4 cup of pudding
4 - 1 heaping TBSP of Cool Whip


REPEAT

Then top with the shaved white chocolate.


Screw on lid.


Ta-da!!!!

These end up being only 250 calories for a whole jar!  Yum!! 

I am very happy with this recipe, and I think it turned out to be what I was going for.

I would say, definitely a make again recipe.  I hope you make it!!  Let me know if you do, I would love to hear about it!

Now I'm ready for spring and lots of fresh berries!!

BTW - Here is my little berry monster.  She LOVES berries!


Sunday, June 10, 2012

Coconut Layer Cake


Coconut Layer Cake

Here is the link to the recipe.

Spring and summer always make me want to make delicious light confections.  Coconut cakes are at the top of that list.  I have tried many a coconut cake/cupcake  recipe and have not found one with enough of the yummy coconutiness that takes you away to an island in the tropics…warm breezes…laying in a hammock…sipping a pina colada…….Sorry, I guess I drifted off there for a minute!

This recipe is another of my attempts at the divine coconut cake.
It starts off pretty simple – preheat oven, butter the cake pans.  I only have two 8 inch pans, so I used these [finding out later that 9 inch ones would have worked better!].
I put all the flour, baking powder, baking soda, and salt into my little bowl and whisked them together.  I like that this recipe tells you to use the “cheat” method of sifting the dry ingredients.  I have made recipes for cakes that request that you sift the dry ingredients 3 times!!!!  [picture angry frustrated flour covered face]  Who in their right mind has the time and the desire to sift something 3 times!               Ok, I think I’m calm now…  I love the cheat of whisking my dry ingredients instead of sifting.  The reason you sift the dry ingredients is mainly to make the flour lighter [by fluffing air into it] and to incorporate the other leavening and flavor ingredients [baking powder, baking soda, salt] together.


I set my dry ingredients aside, and now it’s time to cream the butter and sugar together.  The recipe says to beat the butter, sugar, and coconut crème together – BUT – I think it works better to cream the butter and sugar together [beat in mixer until light in color] and then add the coconut crème. 
whipped up butter with sugar added

pouring the coconut creme into the sugar and butter

Here are my choices for coconut crème:

I love the Coco Real – only because it is in a bottle and you can just toss it back in the fridge if you have leftovers.  And after you lick your measuring cup [preferably after you put the crème in the mixer], you will wonder where this stuff has been all your life.  Yum! 
 Warm breezes…frosty drink…sand in my toes…
Back to reality.  After I beat the coconut crème into the butter and sugar to create a fluffy coconutty, buttery, sweet goodness, it’s time for the eggs.

You need to separate the yolks from the whites [I do this by cracking the whole egg and putting it in my hand letting the white separate from the yolk through my fingers into a separate bowl.] 

Once you have all four eggs separated, you can beat the yolks into the goodness.  Then add in the vanilla extract.  Once this is fully incorporated, I added in the buttermilk.
Set this aside, and now it’s time to whip it, the egg whites that is!  Whipping egg whites can be tricky.  The main problem you could have is that there may be some fat in the bowl from a previous use, or some of the yolk may have come off in the whites when separating.  If there is fat in the egg whites, it will be hard to whip them.  Make sure your bowl is clean and no yolk made it into the whites.  As you can see I whipped mine in a separate bowl with my hand mixer. 

half way through

Whip away!  The second photo above is about half way through.  Below is what you are looking for.  Stiff peaks.  When you pull up the beaters, the eggy fluff should stand straight up.  If it falls over, you need to continue to whip it some more.  Whip it good.  [For the life of me I can’t get the Devo song out of my head!]

Now just fold into the goodness mixture.  I put it in the bowl and use a spatula to fold it in gently.  The whipped egg whites add an airy texture to the cake, so you don’t want to over mix [and pop all the lovely air bubbles we whipped in]. 


Now just divide the batter between the two pans [preferably 9 inch], and bake away!
Chobee likes to help clean… Don’t worry, I actually wash the spatula afterwards!

And this little one likes to watch Mommy baking!  Too bad she can’t lick the spoon yet…Chobee might get a little jealous though!


After a longer than 45 minute bake…due to the smaller 8 inch pans, here is what our cake looks like.  It got a little too brown for my taste on the outside and bottom.


While our cakes cool, it’s time for the delicious Cream Cheese Frosting!  It’s basically a general cream cheese frosting, but yummied up with some coconut crème!  Yum.  Just cream the butter and cream cheese together.  [It really makes a difference to let the cream cheese come to room temp]  Then add the powdered sugar, vanilla, and coconut crème and mix together until it is velvety smooth.

Now it’s time to put it all together!!  I like to even up my cake layers by cutting off the tops [to even up the layers] with a serrated bread knife.  I’ve heard of people being able to use thread or floss to do this too.


Put the cut side down on the cake plate for your first layer.


Put a glob of frosting on the top of the first layer and spread with an offset spatula [here is the one I use].  Then sprinkle flaked coconut on top.  Then place the other layer cut side down on top of the frosted first layer.

Ok, my layers look a little ridiculous.  This is totally OK!  Don’t freak out if your layers are funky like mine.  Frosting can cover a multitude of sins!  Now time to frost.  I know, it’s is scary to frost a whole layer cake!  But you can do it!
I usually start with the top and then work the sides around.  Put a blob on the top of the cake, and with an offset spatula, push the frosting around until it hits the edges.  Then put a blob on the side of the cake close to the bottom, and then push the frosting up and clockwise.  Continue this motion turning the cake plate clockwise until you meet the first frosted side.  Then you can just tidy up a bit by adding frosting to bare spots and smoothing it out.  Wasn’t that easy!  Ok, maybe not easy, but if I can do it, you can!


Even if you don’t get the frosting perfect, it doesn’t matter because we get to throw coconut all over the cake now!  It will hide any imperfections and make it look super fancy.  
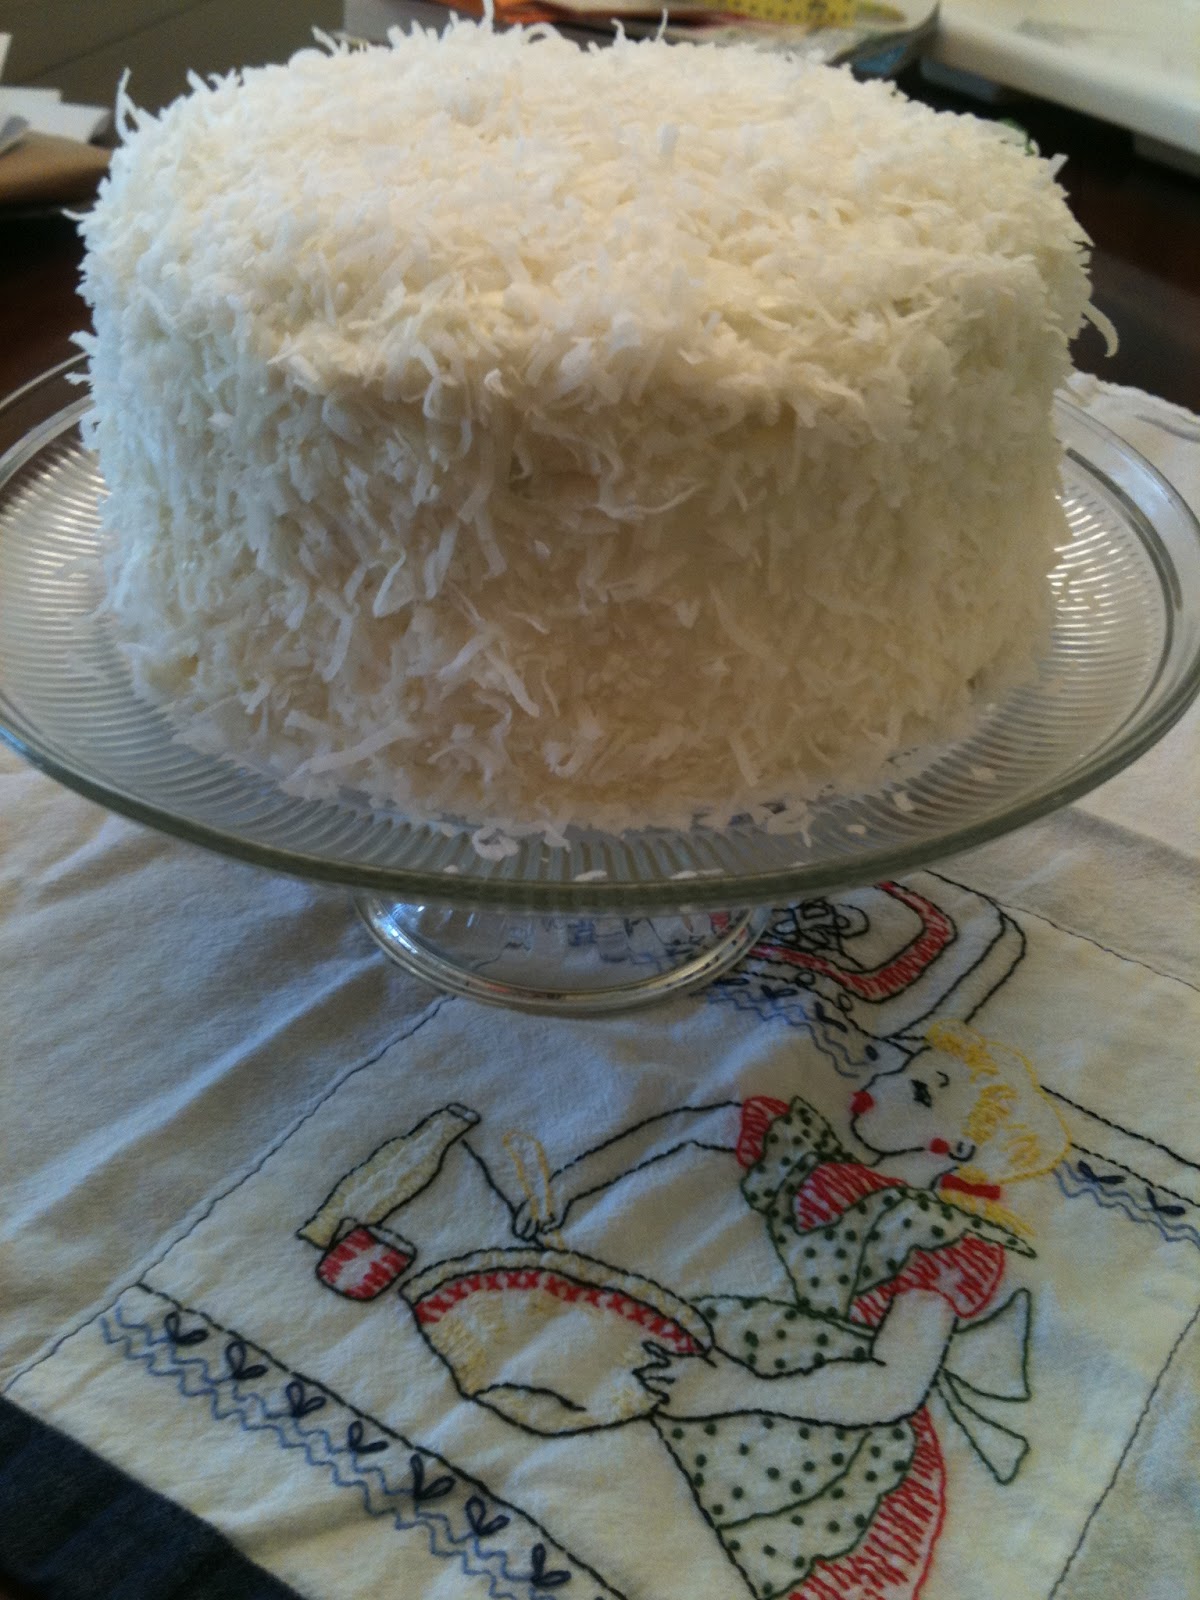
Just grab a handful of shaved coconut, and throw it on top.  Now cup it in your hand and push up against the sides of the cake.  Rotate the cake until you have every side covered.  It will look messy!


Now just take a damp paper towel and run it along the bottom of the cake plate to take off any excess frosting and coconut.

And….Voila!  Pretty, fancy coconut cake!
Now to taste…

Overall I think this recipe is the best one I’ve tried yet.  That dang coconut dream is so illusive for me!  Maybe I am too picky, or maybe I just haven’t found the best recipe yet.  [I would love to hear about your recipes!]
How to improve… I would possibly toast the coconut for the outside of the cake.  It changes the flavor a little and I love toasted coconut, but it won’t give you the beautiful fluffy pure white cake.
You can also add some FrontierCoconut Flavor to the batter.  This was recommended to me by Joshua John Russell, the instructor of my Viking Cooking School Cupcakes class I took a few years ago.  He has been on the Food Network a few times in cake competitions!  I know, I got some tips from a celebrity…I’m really very cool. 
So this recipe would be a make again – but I would add some of the flavoring and maybe toast the coconut.
Now, who wants a Pina Colada!!!???

Sunday, February 26, 2012

Pumpkin Oatmeal Muffins

Now that all of the sticky buns are gone, and we only have about a cup of milk left, we have nothing for breakfast!  On a day like this, I usually see what ingredients I have on hand, and whip up something like pancakes or muffins.  Today I had canned pumpkin left over from Thanksgiving and Christmas last year.  I guess I didn't end up making all of those yummy pumpkiny things that everyone wants to make during the holidays.  I would like to say that I did have a pretty good excuse being 9 months pregnant :)  That brings me to today's  breakfast!  Pumpkin Oatmeal Muffins!  I searched on the internet and found this recipe on food.com.  I love pumpkin muffins, and I really like the addition of oatmeal.  It adds more chew and some great health benefits [to outweigh the cinnamon butter I made for them...yeah I said cinnamon butter]!  Here we go!


Pumpkin Oatmeal Muffins

Here is the link to the recipe.

I don't make a lot of recipes on www.food.com simply because they are are not tested in test kitchens like recipes on Martha Stewart or Food Network.  It's people just like you and me that post their recipes so there can be flaws...but this one actually turned out pretty good! 

Like most muffin recipes, we use the "muffin method" for mixing the ingredients together.  This makes for more of a muffin texture rather than what you would get if you used the "creaming method."  The creaming method is when you add the sugar to the butter and cream the mixture, then you add the eggs, and then the dry ingredients alternating with milk.  The creaming method gives you more of a cupcake than a muffin.  The muffin method in this recipe combines all of the dry ingredients [which I whisked together].  


Then you combine all the wet ingredients. [I used pecans instead of walnuts...yep, I'm a Georgia girl!  We like our pecans!] Then you add the wet to the dry and combine.


Make sure you don't over mix!  You will get flat little concrete balls if you over mix :)  Not yummy!  I just folded the wet into the dry by making large circular motions with the spatula.  Remember to make sure you get all the dry ingredients from the bottom of the bowl...they would get their feelings hurt if you left them out.

Here is what it looks like when it is completely mixed:


When you have all the ingredients mixed together, it's time for the muffin tin!  I used muffin or cupcake wrappers for 12 and then I had enough batter to fill up 4 more with out the wrappers.  I also added a sprinkling of oatmeal to the tops of the muffins.  I think it looks pretty :)


I baked mine for about 22 minutes, took them out, and let them rest for about 5 minutes before turning them out onto the rack. 


While they were cooling, I whipped up some cinnamon butter!  YUM!  All I did was take about half a stick of softened butter and creamed in about a teaspoon of sugar and a quarter teaspoon of cinnamon.  You can do this with basically any flavoring, but I thought cinnamon would be perfect for these!


Time to smooth that yummy cinnamon butter onto the warm muffin! [Drool]


After tasting these, I actually like the ones that did not have the wrappers.  They got this yummy caramelized crust on them that was chewy and delicious!  So I would suggest not using the wrappers and going naked into the muffin tin! 

I would say that these are a make again, but maybe a little on the underwhelming side.  The pumpkin flavor isn't that prominent.  Maybe add a little more pumpkin and some more cinnamon to bring out the flavor?  Over all, I would give it a B.  But still yummy for Sunday morning!

Let me know what you think!

Leah